Showing posts with label project ReStyle. Show all posts

Saturday, June 18, 2011

reStyle: Mediaeval dress

This dress was one of those that not even I, after a lot of training in parting from things, could have given away.

before

It's linnen, the comfiest thing to wear in summer, beautifully embroidered and easily adjustable to body shape with the bands on the sides.
I bought it for quite a lot of money on a mediaeval fair. The design is very basic and I've worn it to a variety of occasions over the years. Since I stopped swordsfighting I'm not into the mediaeval scene so much anymore and the dress slumbered in my closet. Although I often looked at it and wished I could wear it, it was just not adapted for daily use.
The bat sleeves were getting in the way of everything and whilst the length was absolutely appropriate for a mediaeval woman, it was admittably not exactly flattering if you looked at it from a 21st century point of view.

Taking the scissors to this piece was one of the boldest things I have done in a while, but definitely worth it!

after

I shortened it about 30cm (ooh, the things I'm gonna make with that fabric!) and ruffled the sleeves by simply sewing an elastic band into them.
The sleeves look really cute and stay where they are and the shorter skirt makes it easier to combine and layer the dress. I wore it all day today and I absolutely loved it.

Baking bread and doing laundry feels so much more glamorous and pioneer-ish when I wear this dress! ;o)

(You might notice that the hem is not quite finished, but I intend to fix that as soon as I have the sewing machine back!)

Wanna see more reStyled projects? Check out the flickr group, it's so inspiring!!

Sunday, May 29, 2011

project reStyle: Pink and plaid

Creativity has all been about sewing lately. I'm really in love with it.
My newest project included an old Tee and some checkered fabric. It was rather complicated and is far from perfect. I don't think it's the perfect fit, either. I love to wear it all the same, because it's so wonderfully silly.


Tuesday, May 24, 2011

Let's have an adventure!

Wow, today has been such a productive day! I could fit almost everything in that I planned on doing, and it was a lot.
But there's one thing I'm really excited about that I made today. Remember that we watched "Up!" on Sunday? Well, that movie just really inspired me. I even thought it was more impressive than the first time I saw it. I instantly decided that I needed an adventure book of my own. And since tomorrow's my birthday, I thought it would be a good time to start a special book and aim at filling it with lots of exciting things until next year.
I found the perfect book at the brocki today: 


Just an old, ugly photo album with a plastic cover. But I liked the format, the way it is bound together with a piece of string, and the black pages.


I cut out all the seethrough pages that you get in photo albums and ripped off the covering paper on the front and the back.

Then I wrapped it in some cute fabric, glued new paper on the insides and made a label. I must admit that I got a bit carried away. It always happens when trinkets and a glue gun are involved...
This is the book from the movie:


And that's mine:


Do you think it's too girly for an adventure book? I seem to end up with girly stuff a lot these days. I've never been the girly type. Hey, I can hear you laugh over there!

I can't wait to start filling it! I added "Trucs à faire" to the first page, because Ellie has it in her book, too. Somehow the writing in the movie version that we had was in French, so that stuck with me.


On the fabric is a little quote saying: "Life is too short to be comfortable!"
I added a little drawing of a girl ready for adventures, and another quote:


"What you see depends on what you are looking for!"

I found all of Russel's scout badges for downloading (oh, fantabulous interweb!) and I wanna print them and add them to my stories.
Wow, I can't WAIT!

Also can't wait for tomorrow, I'm getting a birthday piercing and we're going to have a lovely little picnick in the park in the evening.
I hope you will all have a great Wednesday full of little adventures!

Monday, May 16, 2011

project reStyle: Get me a boat!

A very quick and easy restyle of a dress I bought at the Brockenhaus. I simply shortened it (no before picture - when will I learn?? But believe me, I looked like Averell Dalton in a swimsuit! ^^) and added a tiny bit of shirring (love, love, love!) just under the bustline to give it a bit of shape definition.

Tadaaa! ;o)


PS: Aren't these pictures fab? The style is called 'smudged lense' and it's the latest big thing on picnik. *lol*

Sunday, May 15, 2011

project reStyle: Sunny sundress

I haven't posted any refashionings in a while, but I'm very on track with my sewing lately, I'm so happy with how it comes along. Learning how to sew my own clothes is one of my goals for this year. Ever since I've given my mother's old Bernina another try the two of us have been teaming up beautifully. I always had problems with her jamming or ripping threads and other tedious stuff. So I decided to get my own and I bought a very cheap and simple Singer which was a total desaster. It couldn't sew a single hem without jamming and making a horrible mess out of everything. Dissapointed, I turned back to the Bernina again and lo and behold: She is humming away like a busy little bee.

And that's what came out:


This used to be a maxi skirt that I wore to pieces (no before photo... I'm so horrible at this! Sorry!). I cut off the waistline, hemmed it and then shirred it.  Yes, shirred. It's the magic word, ladies and gentlemen.
Repeat after me: Shirring, shirring, shirring...
Seriously, it's the coolest invention ever. I've been wanting to try it for ages and would never have believed how simple and effective it is.

It is a technique for gathering a garment but at the same time keeping it flexible. In a nutshell, the underlying sewing thread is elastic, which makes the lines pull together and gives the garment more body definition.
You can see the lines better in this picture:


I had so much fun playing around with it, adding lines until it fit just right. Then I shortened it and added two shoulder straps.
Voilaaa!


Love, love, love it!!


read more!

Tuesday, April 5, 2011

Project ReStyle: A hefty shirt!

Remember that old sheet I made a skirt from? Well, I still had some big enough leftovers to try something else. I decided to sew a T-shirt. Most of my sewing experience comes from altering existing items and I had made the resolution to try and make different clothes from scratch this year. I figured a shirt wouldn't be that hard, so I jumped right into it.

I took the pattern from my favourite shirt, just roughly tracing around it. I still don't know how I managed to get the arms right because speaking with a seamstress friend afterwards she said it couldn't really have worked that well. Well, it did, the shirt is quite a satisfying shirt. Like with the panties I made, the edges are still very rough and unprofessional.

I dyed it blue to get a nicer color and it instantly made me think of the smurfs. So I decided to get a nice smurf picture printed out and make an attempt at stenciling.

It worked nicely except for my own stupidity which made me paint a part that does not belong to his body and forgetting to leave the space for the heart on his arm.

Well, you know I'm not a perfectionist, so I still wear it quite proudly. ;o)


Monday, March 14, 2011

Project ReStyle: Stamp-O-mania!

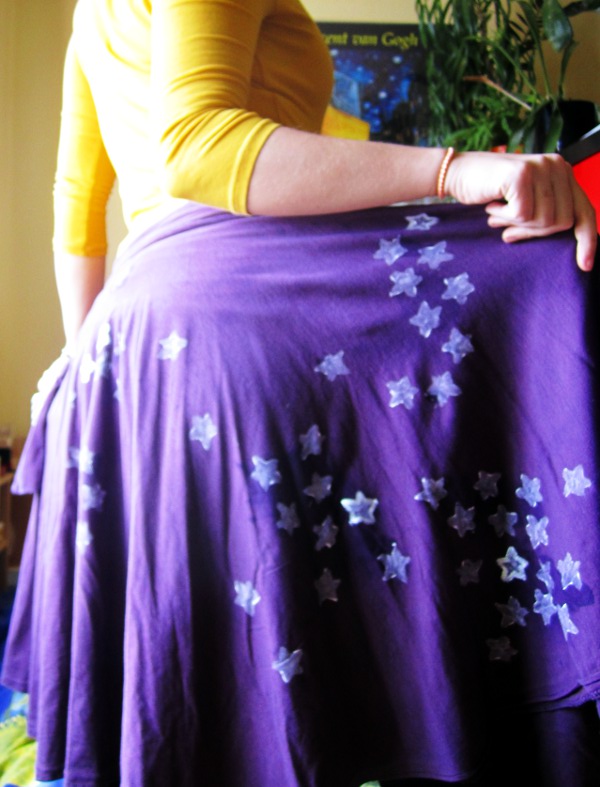
Hey, remember that skirt with the stains? Well, it seems like I found a solution:


Well, obviously, these stars *look* quite magical, but they can't make the stains dissapear. But when I wear it, nobody's gonna notice! (Now you know what sort of person I am... :p)

I made the star-stamp myself with a bit of linol I had left from the No-Pants-Ride, and it worked so well I dabbled in it some more.


I carved a little heart out of an eraser. That's much easier to do than linol, because it is much softer, and in the end because it is a block it really makes a nice stamp that's easy to handle. I'm so gonna get some more erasers to try more difficult designs. Oh and the idea is from Holly at "Two Cheese Please", she's the absolute expert in carving and she's got a nice tute on making your own stamps!

Speaking of links, here's a flat you totally have to see: Cesa's Recycled Home over at ReNest, such an amazing sense of style, how she uses all that 'garbage' is just breathtaking!!

In other news, I'm still studying hard to catch up on the news. The more I read the more I realise that I have no foundation whatsoever to put all these snippets of information on, so it only makes me look into deep holes of knowledge that I'll have to fill... but I'm working on it.
Meanwhile all this theory will not keep my from sending my best thoughts and prayers out to all the people in the world who need them. Everybody's writing about that these days, so I feel I don't have to flatten it out, too, but of course it's on my mind and makes everything else I babble about feel a bit mundane. But it won't help anybody to sit on my butt and cry. I feel like making an effort to understand what's going on is soothing me quite a lot.

Something that's also making me sad or rather quite angry is that Blogger seems to be all over the place these days. The design-editor doesn't work, picture uploading is only possible in the really ugly old post-editor, but for linking I have to switch to the new one or edit the HTML directly (yay, I actually remember how to do that...) because it seems broken, and and and... I thought nowadays it should be possible to make a smooth and handy UI that actually works... I was planning on a big makeover for the blog to fit the new design, but this really puts me off and I'm thinking about switching the host again... *meep*

Computer-related, but nicer: I also took up studying BASH a few days ago, because it makes me crazy not to know what's going on in my computer. The laptop is my second-best friend on this world, so I want to be able to read his mind. ;)
Well, that's also hard, and today's lesson left me quite flattened, but Trev went through it again with me in the evening, and now I feel like I've got some really really basic understanding of stuff... that means it's getting interesting now!

What are you learning this week?

Monday, March 7, 2011

Project ReStyle: Sweet dreams!

Sometimes Trev stays up longer than I do, working on the computer or reading. I don't mind that at all, but sometimes the light keeps me from drifting away as fast as I normally would. And since it seems that I don't get anything serious done today, I invested some time and made myself a sleeping mask.


I used an accidentally felted vest, some leftover fabric, the sleeve of an old jumper and an old stocking.
I cut a pattern from paper and cut the middle piece out of the felt, to give the mask some stability. Then I added the fabric on both sides (I used the soft sleeve for the inside and the shiny velvet-y stuff for the outside). I cut the stocking to the right length and threaded it through some pink ribbon to serve as a headband, since I realised I'd run out of elastic. It worked wonderfully. Then I added a piece of the lace from the top of the stocking to the front of the mask for decoration, trimmed the ends neatly - et voila!


Seems like I'll have to share though...


Happy Monday to you! And if it is not so happy, consider making something - even a small thing. It really helps, I tell you.
love from me to you!

Saturday, February 19, 2011

Project reStyle: Toesocks to armwarmers

Here's a little thing I made yesterday, before heading out to a coffee date. I sorted through my wardrobe the other day (one of the most emotional steps of pr365 so far) and realised I have a bunch of toesocks that I love because of their colors and motives, but never wear. I have never gotten used to the feeling of wearing them because I don't have much chance to do so. Since I wear at least two layers of tights/stockings/socks 99% of the time, toesocks are not so useful. (they would have to be the first layer where nobody can see them, I haven't tried it but I am almost sure wearing toesocks over normal socks is impossible. ^^)


Now I can wear them where everybody can see the cute reindeers and snowstars:

Monday, January 31, 2011

project reStyle, week 3

Woohoo, this week I'm early. I've been so good all day, running errands and paying my bills and doing all the paperwork, I even managed to take a picture of my newest refashion:


I didn't actually do any sewing on these trousers. They were a pale lilac before and got really dirty whilst scrambling through the woods, so I threw them in the dyepot with last week's skirt and now they're as good as new!

I'll add a 'before'-picture another time. At the moment I can't access my external harddisk (where all my data is, since I have a tiny netbook and don't want to clutter it too much), because Trev is setting up our shiny new wireless one! Yay!

Wednesday, January 26, 2011

ReFashion week 2: circle skirt from old bedsheet

I've had this tutorial on cut out + keep bookmarked for a long time, and when I came across this old and ugly sheet in the back of my closet, I knew tha moment had come.


For this skirt a full circle of fabric is cut, which makes it very swirly - just as I love it! Adding a waistband was all that was left to make it a skirt.
Apart from the color, which - you must admit - is not exactly charming. There were also a few stains, so I decided to dye it with some dark fabric color.
Le voila after dying and finishing the hem.


The color is great, but sadly the stains still show through, and there's quite a lot of them. So I still need an idea of how to cover them up before I can wear it.
Any ideas?

you can find the tutorial here:

http://www.cutoutandkeep.net/projects/circle-skirt-from-an-old-sheet

Monday, January 10, 2011

Sew I thought...

(I stole that line from her)
I think I didn't tell you that one, but I made the resolution to finally get into sewing more this year. Most of the sewing experience I have so far is with refashioning. That's not so big because you don't need to make patterns and it's very quick and doesn't need a lot of material. But I'd like to actually make some of my stuff myself, especially underwear. Well, I thought I'd start with the easiest option there and make some panties.
I took one of my favourite pair and traced around front and back, making two pieces out of some old T-shirt. Not much more to it. The first pair with the bow is a bit rough around the edges as you might see on the picture, so I read a bit about making nice seams and had a close look at some bought ones and then set to work on the second pair. They already look much nicer.


These panties are part of a project that I decided to go with to keep me motivated. It is called Project Restyle. Participators pledge to make items from damaged, unwanted or unusable stuff every week and post about it. I think it sounds like a lot of fun! :o)

Related Posts Plugin for WordPress, Blogger...